Saturday, May 25, 2013

Shoe Shine Rose 薔薇の靴磨き布 作り方 Repurpose Fabric Scrap Tutorial

Knit fabric scrap or old T shirt and old pantyhose became a rose in 10 min! You can use it to take some dust away from your shoes or even wipe your PC screen. Enjoy upcycling!

ニットの余り布、或いは古いTシャツ、と破れたストッキングで薔薇を作りました。10分で作れます。玄関に置いて出かける直前の靴の埃とりに。PCの画面拭きにしても。リサイクルしてね。

fabric rose

1) Cut your old pantyhose about 1/2 inch wide like a rubber band. I used five.

ストッキングを1センチ幅くらいに輪ゴムのようにハサミで切ります。

2) Prepare strings of knit or T-shirt not wider than 1 inch.

ニット生地や古いTシャツなどを幅2.5センチを超えない程度に適当に切ります。

3) Place pantyhose on a small bowl. Please make sure that the number of strings is odd so you need to put together 2 strings into one among all. Tape them using Scotch tape on the outside of the bowl so that they don't move when weaving.

ストッキングを小さいサラダボールのような容器に嵌めます。蜘蛛の巣状にしますが、奇数になるように全体のうち2本をくっつけて1本とします。ツルツル滑るので、動かないようにボールの外側にストッキングをセロテープかメンディングテープで留めます。

4) Weave a knit fabric string into the web.

互い違いに引っ張りながら通していきます。

リサイクル 手芸

5) Cut the pantyhose bands and tie together at back.

適当なところでストッキングを切り、裏で結びます。

Voila! Enjoy DIY!

出来上がり!

布の薔薇

<目次>2013年6月までのAll Posts, What I Wrote!

Tuesday, May 21, 2013

Winnie the Pooh: Piglet 手作りピグレット ハンドメイド (English&Japanese)

I made Piglet, the fourth year in a row of making Winnie the Pooh and his friends, for my niece's birthday gift! I used a vintage MacCall's pattern in 1960s. Piglet seems like the original one in the book of Milne rather than Disney's. I prefer the original ones anyway!

クマのプーさんの仲間、ピグレットのぬいぐるみを作りました。ミルンの原画に似ています。連続4年のプーさんと仲間たちの作製。姪のリクエストに応えた誕生日プレゼントです。

ピグレット 手作り
Finished size is approximately 25cm(10 inch) height to the tip of the ears and 27cm(11 inch) width to hands. It's quite smaller than Pooh as expected!

It was very easy to make. I didn't use the suggested fabric but instead used micro fiber, slightly pinky one for the body, thinking that would fit into Pigret, a little pig. Others I had seen at shops were bright pink which might be similar to the one by Disney but I don't like strong colors for staffed animals for kids.

The back head has two darts. The rompers have a dart in front and 4 tacks in the back.

作るのは簡単でした。ボディーの生地はマイクロファイバーにしました。耳の内側はコットンベルベットです。頭の後ろてっぺんにはダーツが2つ、ロンパースの前にもダーツ1つ、後ろにはタックが4つ入っています。

I also altered the following:

- cotton velvet fabric for the inside of ears instead of the same material;

- cotton knit fabric for the rompers;

- instead of making fringes on the scarf, I cut 2 fabrics and sewed around them to turn out as my material was not suitable to make the fringe.

This Piglet doesn't have the eyebrows as seen in the original book of Milne. Disney changed the face with eyebrows. I guess they added to raise the eyebrows to show face expressions in the animation!

このピグレットには眉がありません。ミルンの原画にもないんですが、ディズニーのアニメでは顔の表情を出すために眉毛を足したんでしょう、きっと。

Hope you like my Piglet! I will sew Kanga and Roo next year. Then I will finish al of five, or six if Roo is counted separately, in the vintage McCall's 8087 envelope! In the mean time, please take a look of Pooh, Tigger, Eeyore I made.

来年はカンガとルーを作ります! それで型紙全部が終了! 今まで作ったプーさんティガーイーヨーも見てくださいね。

<目次>2013年6月までのAll Posts, What I Wrote!


Saturday, May 18, 2013

How to Organize Sewing Patterns using Evernote 型紙の整理方法

You are almost drawn in the increasing sewing patterns collected? This is my way of organizing 148 collected patterns using Evernote!

エバーノートを使った型紙の整理・管理方法です。ヴィンテージ型紙が大好き。現代物も好き。なので現在のところ数えたら148も集めてしまっていました。

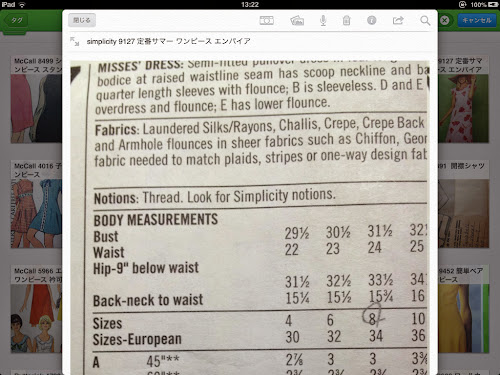
how to organize sewing patterns evernote

The incredible benefits of using Evernote for your patterns are:

- Easy to search what you have;

- Easy to get the needed yardage even outside at a fabric shop if you use iPhone or smart phone! Don't buy more than enough yardage when you encounter a nice fabric without any intention to buy by chance!

エバーノートの素晴らしさは、自分のノートを検索できるところ。特に写真上の文字まで認識して検索してくれるのは不思議。

- 何を持っているのかサーチが簡単。

- 出先でもスマホで呼び出し検索できるし、用尺の確認ができるので、突然ステキな生地を見つけた時にも諦める必要もないし、不必要な用尺を買わなくてすみます。

how to organize sewing patterns


エバーノートで型紙整理

Above is the result of search by "dress".

上の写真は「ドレス」で検索した結果。

型紙 整理 方法

Searched by "Kids".

「子ども」で検索。

Searched by "Bag".

「バッグ」で検索。

Searched by "Doll".
上は「ドール」で検索。
 

When you make a note in your Evernote, you need to do the following:

- Enter the brand name and its number into the title.

- Enter all information into the title. For instance, If the pattern includes many of animal dolls, enter all the names such as Elephant, Cat, Dog, Frog, etc. Or if you like the collar of the dress, write "collar" in the title as well. Next time you want to check some of cute collar dresses, it will show up. By this, your search will be extremely easy and correct!

- Take two photos. Make sure to take FIRST the back of the pattern envelope (mark the size by pencil) and NEXT the front. Because Evernote shows the last photo on the list of notes, you need to take the front photo at last so that it is easy to recognize by just looking.


エバーノートで型紙整理するときの注意点

- ノートのタイトルに型紙のメーカー名と番号を入れます。

- 更にノートのタイトルに検索のために必要なコトバを全部入れます。例えば型紙がぬいぐるみで複数の動物がある場合、ドール、カバ、イヌ、ウサギ、カエル、などと書き込みます。この時自分でルールを決めて、動物の名前は全部カタカナ、などにしておきます。ウサギだけ検索!に対応できます。

- ノート用の写真を2枚、型紙の封筒の裏と表を撮ります。必ず用尺情報のある裏を最初に。エバーノートでは、最後に撮った写真が一覧リスト表示の際に出てくるので。


To organize real sewing patterns, file them based upon the manufacturers' name and number... McCalls, Simplicity, etc. Once you get the number from Evernote, go into that file!

実物の型紙はメーカー別、番号別にしておきます。エバーノートで検索してから実際の型紙を取り出します。ね、便利でしょ?


<目次>2013年6月までのAll Posts, What I Wrote!


So Cute Sachet! かわいいサシェ作り方 海外の無料型紙 Tutorial

フェルトかわいいサシェ無料型紙

ランジェリー(コルセット)型のフェルトで作るとても可愛いサシェ、手作り手芸です。バッグにつけてリップクリームホルダーにいいなと思って作りました。無料パターンはこちらのCurblyのサイトからプリントしました。中にラベンダーを入れて普通のサシェ、匂い袋にしてプレゼントにしてもいいですね。

I made a a cute corset sachet for lip balm holder, thanks to this free pattern from Curbly.

リップクリーム ホルダー

一年中リップクリームが必要な私はすぐに取り出せるものがいいなと。

I need a lip balm all year long...

簡単な刺繍をします。いわゆる半返し縫いの要領で。小さくて、刺繍部分があまりないので簡単です。

これを中表に半分に折って、手縫いかミシンで縫います。

型紙をまち針でとめて、型紙の外側2〜3mmのところを縫いますが、一番上のところは開けておきます。

まち針はいつも通り縫う方向と逆向きに刺します。こうすると縫いながらまち針を外しやすいし、イタタっとならずにすみます。

裏返してピンキング鋏でカットし、金具を通したサテンのリボンを縫い付けます。金具は近所の釣り道具屋さんの閉店セールの時に、何かに使えそう〜と買っておいたもので、何に使うものか分かりませんが、上下がクルクルと回転するのでリボンがねじり絡まることはないです。

胸のところに小さくリボンを縫い付けます。

Fold it facing the right side together and place the pattern. Sew the outside of the pattern, say 2-3mm as seen in the photo, leaving the top open.

Turn inside out and cut the top by pinking shears and sew a ribbon as strings and a front decoration.

Enjoy!

その他のハンドメイドのフェルト手芸をご紹介します。

●縫わないフェルトのかわいいソーイングセットの型紙と作り方はこちらからどうぞ

●No-Sew Heart 縫わないハート 紙やフェルトで作るノルウェー手芸作り方はこちらからどうぞ

●ハートのサシェを針刺しに使った首から下げられるソーイングメジャーリボンはこちらからどうぞ

<目次>2013年6月までのAll Posts, What I Wrote!


Thursday, May 16, 2013

Easy Gift for Daddy 子どもが作るパパへのギフト作り方 Tutorial

子どもが作るパパへのプレゼント

子どもが作る簡単ギフトです。姪が叔父さんの誕生日に何かプレゼントしたいと言うので、家にあったもので大きなメッセージボードを一緒に作りました。Amazonの配送封筒のリサイクルです。文字を変えて父の日にパパへのプレゼントにどうぞ。

Easy gift for Daddy or any other special people! I used book package envelope from Amazon. The back of Amazon envelope is a quite interesting surface like an embossed paper. Why not upcycle Amazon package for fun and change the words for Father's Day or birthday as a nice message board?


材料: What you need:

● Amazonのパッケージ封筒。裏がウネウネになっているので、なかなか立体感が出ます。

Amazon's delivery envelope for a book

● アクリル毛糸 (100円ショップにあります)

Acrylic yarn

● 編み針 (100円ショップ)

Crochet needle

● 割鋲(わりびょう、割りピンとも言います) 6号 (19ミリ) 下の写真の鋲です。刺すところが二股に割れます。

Split pins


作り方: How to make:

1) Amazonの封筒の端と下をを切り、一枚のボードにします。

Cut top and sides of the envelope and make a sheet of board.

2) 子どもに鉛筆か細いマジックで文字を書かせます。

Have your kid draw the words with a pencil or pen.

3) アクリル毛糸で鎖編みをします。私は姪に教えて本人にさせました。

Make a chain with the yarn. I taught my niece and let her try.

4) 文字の上に鎖編みを乗せながら、割鋲を適当に鎖編みの上に刺していきます。二股を裏に拡げて固定します。切りっぱなしで大丈夫。裏はこんな感じ。

Place the chain onto the words and push the pins one by one. Cut the chain wherever necessary. The back looks like this.

割りピンは柔らかいので、刺す時に目打ちなどで穴を開けるといいです。

Split pins are soft so you may need to make a small hole using a prick punch.

額にいれて飾ってくださいね。

Please put this in a frame. That would be a nice gift to hang a wall!

<目次>2013年6月までのAll Posts, What I Wrote!

Monday, May 13, 2013

Clean Jewelry Rings 指輪をまとめてキレイにする方法 Tutorial

指輪をクリーニング
ひとつひとつではなく、一気にまとめて指輪のクリーニングをします。

ティースプーンに指輪を上の写真のように入れます。

お湯をカップに入れ(私は900wの電子レンジで40秒)、食器用洗剤をワンプッシュ、そしてリングのはまったスプーンの先で重曹をスプーン半分くらいすくって(オプション、無くても可。)、そのままカップにドボン。

スプーンを上下に動かして混ぜ合わせて、そのまま15分くらい。

何やらツブツブの汚れなどが浮いてきます。

15分くらいたったら、スプーンを持ち上げ流水ですすぎます。

そのあと、再度カップにお湯を入れてスプーンごとドボン。

ペーパータオルで水切りして、リングが暖かいうちにペーパータオルで裏まで拭きあげます。


くれぐれも真珠などはなさらないように。硬度の高いダイヤモンドなどの宝石のみです。グルーで貼り付けているだけのリングなどは熱で石が外れる可能性があると思います。また柔らかい石は重曹で傷つく可能性があります。

熱湯もダメです。指で触れる程度のお湯をつかっています。


Friday, March 8, 2013

How to Organize Bangles & Bracelets ブレスレットの収納方法

やっと見つけたストレスフリーのブレスレットやバングルの収納方法です。何しろ、取り出すのに他のブレスレットを全部動かすのは大変。結果、面倒で使う機会が減ってしまうので、すぐに取り出せるものがないかと考えていました。お店で巨大なまん丸い安全ピン?を見つけて、ああ、これだ!と買ったのがこれです。

ブレスレットが収納方法
ブレスレットがぐるっと回転できるので、いちいち前のものを動かさなくていいです。

ブレスレットが整理
目当てのブレスレット選んだら、安全ピンを外せばOK。

しかし、本来は何に使うものでしょうね。

どこかに掛けても、このまま引き出しに入れても。

シルバー 収納 方法
もう一つ、シルバーのアクセサリーの収納方法です。

夏に銀のアクセサリーを使うことが多いのですが、湿気のひどい日本ではすぐに変色してしまいます。次のシーズンが来ると磨くのが面倒で…。私は、シルバーをお鍋で煮ます。沸騰した水に重曹をいれてお鍋で10分くらい煮て、ザルに出したあと、熱湯をかけます。それからペーパータオルで拭きます。

乾いたらジップロックに入れて空気を出して、さらにストローで空気を吸い出します。これで次のシーズンまで全く色が変わりません。お試しください。